A room-by-room, dollar-by-dollar plan for upgrading your home’s look without a renovation loan.
You don’t need a $30,000 renovation to stop feeling like your living room is “just okay.” Most of what makes a space feel expensive isn’t the price tag on the furniture — it’s contrast, layering, and a handful of finishing touches that most budget guides skip. Below is a practical, no-fluff plan built around the upgrades that move the needle most, what they actually cost in 2026, and the mistakes that quietly waste people’s money.
The Real Pain Points Behind “My House Looks Outdated”
Before jumping into fixes, it helps to name what’s actually going wrong. In reader surveys and home-design forums, the same five frustrations show up again and again:
- Rooms feel mismatched — furniture from five different eras with no unifying color or texture.
- Lighting is flat and overhead-only, which flattens everything else in the room.
- Rental restrictions (no painting walls, no drilling) make people assume upgrades aren’t possible.
- Budget guides recommend items that are still $200–$800, which isn’t actually “budget.”
- No plan or sequence — people buy random décor pieces that never add up to a finished look.
If any of those sound familiar, the upgrades below are built to solve them directly, in order of impact per dollar spent.
1. Start With Paint, Not Furniture
Paint remains the single highest-return aesthetic upgrade for the money. A gallon of quality paint runs roughly $35–$55, and a single accent wall in a mid-size room typically needs one to two gallons.
Why an accent wall works better than a full repaint
A full-room repaint costs more in both time and paint, and it doesn’t create the same visual depth. One deep, saturated wall — behind a bed, sofa, or dining table — gives a room a focal point and makes lighter furniture pop against it. Renters can get the same effect with a large removable wallpaper panel or a peel-and-stick mural instead of paint.
- Best budget colors for 2026: warm terracotta, sage green, and muted clay tones are outperforming cool grays in reader engagement and retail sell-through.
- Skip the primer step only if you’re painting a similar or lighter color over existing paint in good condition.
- Use painter’s tape and a $12 edging tool — it prevents the number one DIY mistake: crooked ceiling lines.
2. Replace Hardware Before You Replace Furniture
Cabinet pulls, drawer knobs, light switch plates, and door hinges are small, but they’re touched constantly and seen up close — which makes their finish disproportionately noticeable. Swapping brass-toned or matte-black hardware across a kitchen typically costs $25–$60 and takes under two hours with a screwdriver.
This single swap is one of the most under-recommended upgrades in budget content, because it doesn’t photograph as dramatically as a full kitchen reface — but it delivers a similar “updated” feeling for roughly 3% of the cost.
3. Layer Texture Before You Buy New Furniture
A common and expensive mistake is assuming an outdated room needs new furniture. In most cases, the furniture is fine — it’s under-dressed. Layering textiles adds warmth, contrast, and a sense of intention that flat rooms are missing.
- A textured area rug ($60–$150) anchors a seating area and covers dated flooring.
- Two or three throw pillows in a contrasting texture (boucle, linen, chunky knit) update a sofa instantly.
- A woven throw blanket draped over an armchair adds visual weight for under $30.
Buy textiles in a limited palette — two to three colors max — so the layering reads as curated instead of cluttered.
4. Fix Lighting Layers, Not Just Bulbs
Overhead lighting alone makes rooms feel like offices. Interior designers consistently point to “layered lighting” — a mix of ambient, task, and accent light — as the difference between a flat room and an inviting one. You don’t need an electrician for this.
- Add a plug-in floor lamp in a room’s darkest corner ($30–$70).
- Swap harsh white bulbs for warm-white (2700K–3000K) bulbs — this alone changes a room’s mood.
- Use a small table lamp or LED puck lights inside a bookshelf for accent lighting.
Where does light temperature matter most? In living rooms and bedrooms — warmer tones read as cozy. In kitchens and home offices, a slightly cooler tone (3500K–4000K) keeps the space feeling functional without going stark.
5. Build a Gallery Wall Instead of Buying “Art”
Custom framed art is one of the most overpriced categories in home décor, often $150–$500 per piece. A gallery wall built from thrifted frames, printed photos, and a few affordable prints achieves the same visual richness for a fraction of the cost.
- Mix frame sizes and finishes — perfect symmetry actually looks less intentional than curated variety.
- Lay the arrangement out on the floor first, then trace it onto kraft paper to plan nail placement without extra holes.
- Include one or two non-art objects (a small mirror, a woven plate) to break up a wall of identical rectangles.
Where the Money Actually Goes
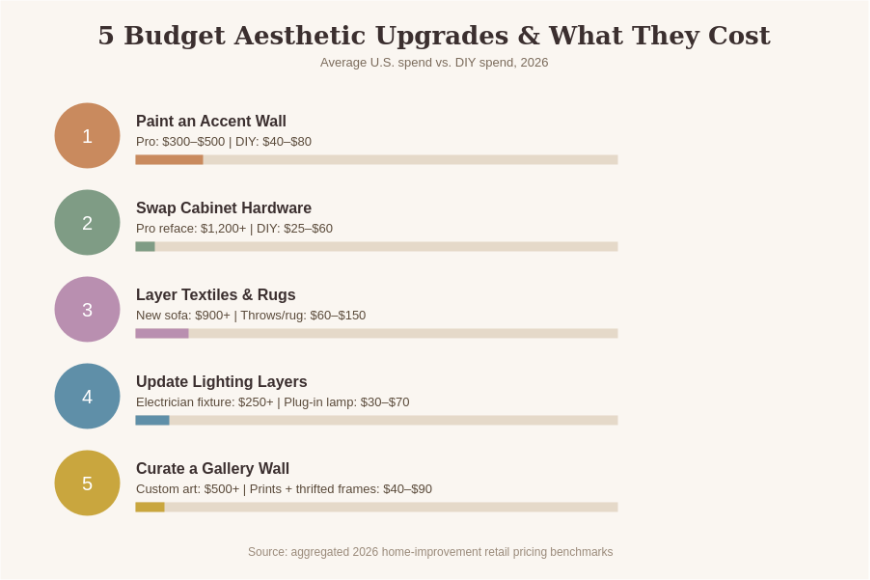
The chart below breaks down what a professional version of each upgrade costs versus the DIY, budget-friendly route — this is the gap most “budget” blog posts don’t actually show.
Ready to plan your own room refresh? Save this guide, pick one upgrade from the list above, and give yourself a single weekend to complete it — momentum matters more than doing everything at once.
Mistakes That Quietly Waste a Budget Makeover
- Buying décor before deciding on a color palette — this is the top reason budget makeovers look disjointed.
- Over-lighting a small space with one giant overhead fixture instead of multiple smaller light sources.
- Choosing trendy statement pieces instead of neutral bases with one or two bold accents.
- Skipping the “edit” step — removing three old items often improves a room more than adding one new one.
A Simple Room-by-Room Starting Order
If you’re not sure where to begin, tackle rooms in this order for the fastest visible payoff:
- Living room — highest visibility to guests, best return on paint and lighting.
- Bedroom — layering textiles here has an outsized effect on how “finished” a home feels.
- Kitchen — hardware swap alone can transform the space in an afternoon.
- Entryway — small, but it sets the tone for every room after it.
Want a printable checklist version of this room-by-room plan? Subscribe below and we’ll send it straight to your inbox, along with our next budget design breakdown.
Frequently Asked Questions
How much does a full budget aesthetic upgrade cost for one room?
Most single-room refreshes using the strategies above land between $150 and $400, depending on room size and how many textiles or lighting pieces you add. That’s a fraction of a typical professional redesign, which often starts around $2,000 per room.
What’s the single best upgrade if I only have $100 to spend?
Cabinet or drawer hardware plus a warm-white bulb swap. Both are under $80 combined, take an afternoon, and are consistently the upgrades people notice first when they walk into an updated space.
Can renters do any of these upgrades without losing their deposit?
Yes. Removable wallpaper, plug-in lighting, textiles, and gallery walls built with adhesive strips instead of nails are all fully reversible and renter-friendly.
How do I choose a color palette that won’t look dated in a few years?
Anchor the room in one neutral (warm white, greige, or soft clay) and add no more than two accent colors through textiles and art. Trend colors change; the neutral base is what keeps a room feeling current longer.
Is it better to update furniture or accessories first on a tight budget?
Accessories first. Rugs, pillows, lighting, and hardware cost less individually and have a faster visual impact than replacing furniture, which should usually be the last step once the room’s direction is clear.
A budget aesthetic upgrade isn’t about spending less on the same plan — it’s about following a different plan altogether, one that prioritizes paint, lighting, texture, and hardware over big-ticket furniture. Start with one room, follow the order above, and let the results build momentum for the next one.